[Webix]サイドメニュー
Webix Advent Calendar 2014 9日目の記事です。
今回は管理画面などでよくつかわれるサイドメニューを作ってみます。
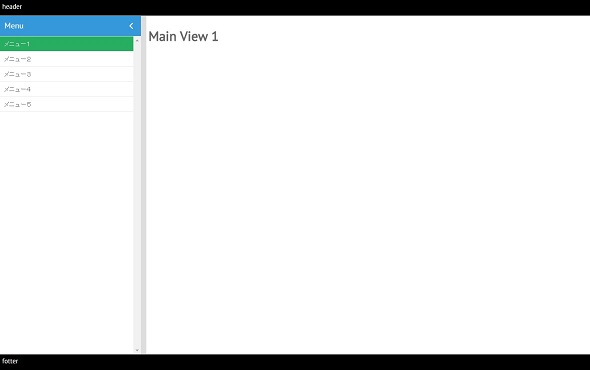
Webixでサイドメニューを作成するのはひじょうに簡単でListコンポーネントを少しカスタマイズするだけで作成できます。
サンプル
|
1 2 3 4 5 6 7 8 9 10 11 12 13 14 15 16 17 18 19 20 21 22 23 24 25 26 27 28 29 30 31 32 33 34 35 36 37 38 39 40 41 42 43 44 45 46 47 |
//メニューデータ var menuList = [ {title:"メニュー1", targetView: "mv1"}, //title:メニュー名, targetView:対象とするmainView {title:"メニュー2", targetView: "mv2"}, {title:"メニュー3", targetView: "mv3"}, {title:"メニュー4", targetView: "mv4"}, {title:"メニュー5", targetView: "mv5"} ]; //サイドメニュ―要素 var sideMenu = { header:"Menu", //リストビューにヘッダを付ける body:{ view:"list", width:300, template:"#title#", select:"select", //セレクト可に設定 on:{ onAfterSelect:function(id){ //リスト選択後に発火するイベント var targetView = this.getItem(id).targetView; //選択されたitemのtagetViewを取得 $$(targetView).show(); //対象となるmainViewを表示 } }, data:menuList, //メニューデータを反映 } }; //メインビュー要素 var meinView = { //animate:{type:"flip", subtype:"vertical"}, //切り替え時のアニメーション指定 cells:[ {id:"mv1", template:"<h1>Main View 1</h1>"}, {id:"mv2", template:"<h1>Main View 2</h1>"}, {id:"mv3", template:"<h1>Main View 3</h1>"}, {id:"mv4", template:"<h1>Main View 4</h1>"}, {id:"mv5", template:"<h1>Main View 5</h1>"}, ]}; //レイアウト指定 webix.ui({ rows:[ {template:"header", css: "bkbg", height:35 }, {cols:[sideMenu, meinView]} , {template:"fotter", css:"bkbg", height:35 }, ] }); |
基本的にはリストビューにonプロパティを設定しクリックされた際にtagetViewの値で指定されたidのメインビューを開いているだけです。
webixではコンポーネントにidを指定すれば、$$(“id名”)でコンポーネントを選択し操作することができます。(HTML要素のid属性とは別のものなので注意)
今回の場合mainViewとして五つのtemplateコンポーネントをcellsに配列として渡しています。cellsに渡されたコンポーネントは画面初期表示時にはcells[0]のコンポーネントだけが表示されます。
$(“id名”).show()でcellsの中身を入れ替えることができます。
|
1 |
$$("mv3").show(); //id:mv3のコンポーネントが表示される |
複雑な例
Webixのレイアウトシステムと組み合わせれば、下記のような複雑な配置も簡単に設定することができます。
|
1 2 3 4 5 6 7 8 9 10 11 12 13 14 15 16 17 18 19 20 21 22 23 24 25 26 27 28 29 30 31 32 33 34 35 36 37 38 39 40 41 42 43 44 45 46 47 48 49 50 51 52 53 54 55 56 57 58 59 60 61 62 63 64 65 66 67 68 69 70 71 72 73 |
/** サイドメニューデータ *************************************/ var a_List = [ {title:"メニュー1", targetView: "a_mv1"}, {title:"メニュー2", targetView: "a_mv2"}, {title:"メニュー3", targetView: "a_mv3"} ]; var b_List = [ {title:"メニュー1", targetView: "b_mv1"}, {title:"メニュー2", targetView: "b_mv2"}, {title:"メニュー3", targetView: "b_mv3"} ]; /** メインビュー *************************************/ var a_view = { animate:{type:"flip", subtype:"vertical"}, //切り替え時のアニメーション指定 cells:[ {id:"a_mv1", template:"<h1>A Main View 1</h1>"}, {id:"a_mv2", template:"<h1>A Main View 2</h1>"}, {id:"a_mv3", template:"<h1>A Main View 3</h1>"} ]}; var b_view = { animate:{type:"flip", subtype:"horizontal"}, //切り替え時のアニメーション指定 cells:[ {id:"b_mv1", template:"<h1>B Main View 1</h1>"}, {id:"b_mv2", template:"<h1>B Main View 2</h1>"}, {id:"b_mv3", template:"<h1>B Main View 3</h1>"} ]}; /** サイドメニュービュー *************************************/ var sideMenu = { body:{ view:"list", template:"#title#", autoheight:true, select:"select", //セレクト可に設定 on:{ onAfterSelect:function(id){ //リスト選択後に発火するイベント var targetView = this.getItem(id).targetView; //選択されたitemのtagetViewを取得 $$(targetView).show(); //対象となるmainViewを表示 } } }, }; //メニューオブジェクトをコピー var a_sideMenu = webix.copy(sideMenu); var b_sideMenu = webix.copy(sideMenu); a_sideMenu.header = "A MENU"; //メニューヘッダー設定 a_sideMenu.body.data = a_List; //メニューデータを適用 b_sideMenu.header = "B MENU"; b_sideMenu.body.data = b_List; /** レイアウト指定 *************************************/ webix.ui({ rows:[ {template:"header", css: "bkbg", height:35 }, { type:"space", cols:[ {rows:[a_sideMenu, a_view]}, {rows:[b_view, b_sideMenu]}, ] }, {template:"fotter", css:"bkbg", height:35 }, ] }); |